本文属于机器翻译版本。若本译文内容与英语原文存在差异,则一律以英文原文为准。
创建多模型终端节点
您可以使用Amazon SDK for Python (Boto)或者 Amazon SageMaker 创建多模型终端节点。
创建多模型终端节点(控制台)
创建多模型终端节点(控制台)
-
打开位于 https://console.aws.amazon.com/sagemaker/
的 Amazon SageMaker 控制台。 -
选择 Models (模型),然后从 Inference (推理) 组选择 Create models (创建模型)。
-
对于 Model name (模型名称),输入一个名称。
-
适用于IAM 角色。选择或创建附加有 AmazonSageMakerFullAccess IAM 策略的 IAM 角色。
-
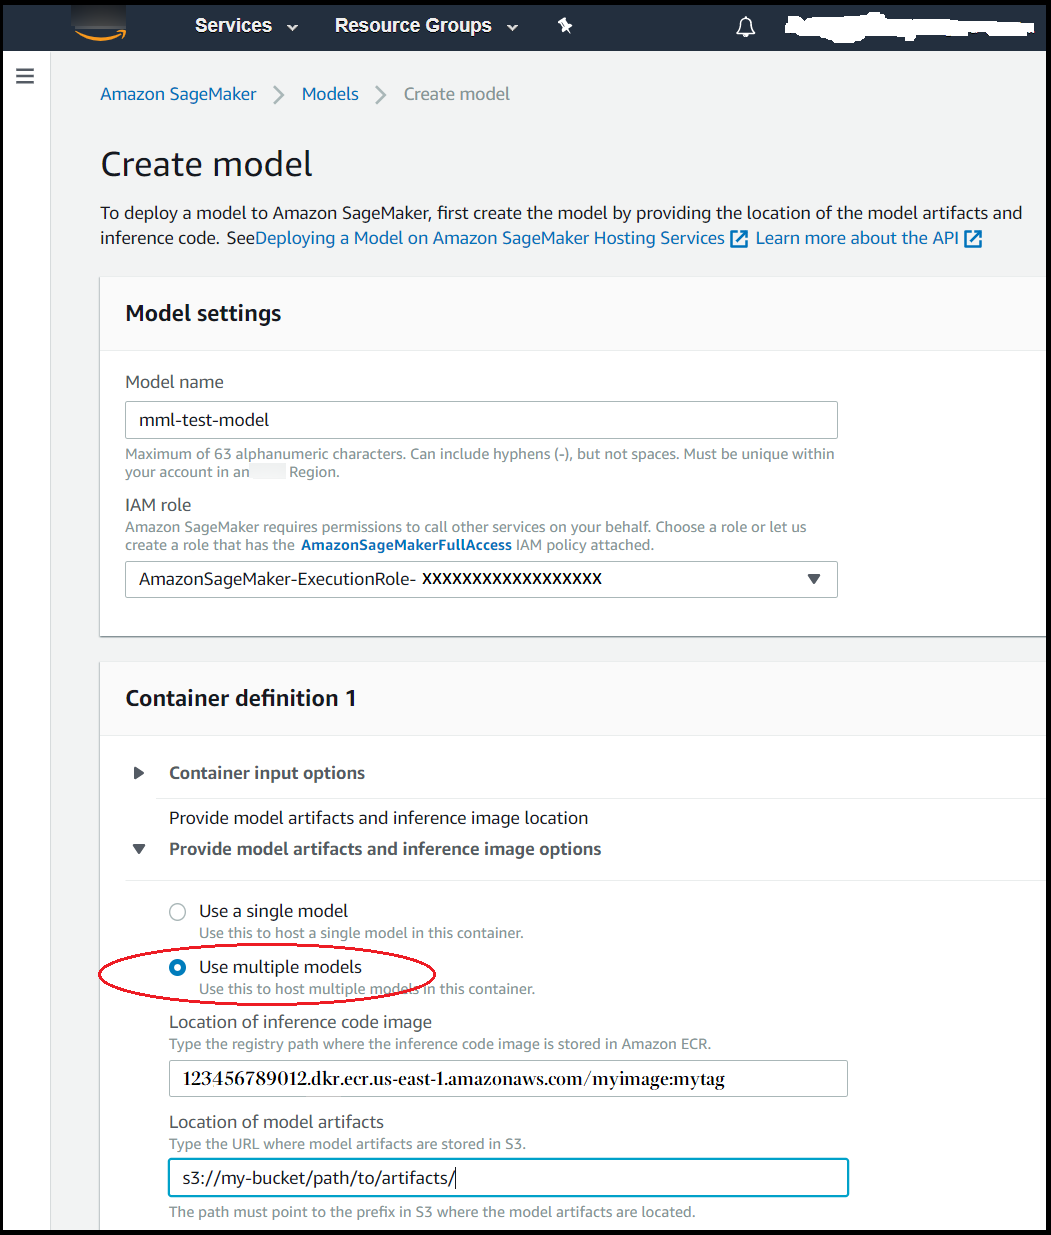
在 Container definition (容器定义) 部分中,请为 Provide model artifacts and inference image options (提供模型构件和推理映像选项) 选择 Use multiple models (使用多个模型)。
-
选择 Create model (创建模型)。
-
按照单个模型终端节点的部署方式来部署多模型终端节点。有关说明,请参阅将模型部署到 SageMaker 托管服务。
创建多模型终端节点Amazon SDK for Python (Boto3)
您可以使用 Amazon SageMaker 创建多模型终端节点。create_modelcreate_endpoint_configcreate_endpointMode参数值,MultiModel. 您还需要通过ModelDataUrl字段,该字段指定模型构件所在的的 Amazon S3 中的前缀,而不是部署单个模型时指定的单个模型构件的路径。
有关使用 SageMaker 将多个 XGBoost 模型部署到终端节点的示例笔记本,请参阅。多模型终端节点 xgBoost 示例笔记本
以下过程概述了创建多模型终端节点的示例中所使用的关键步骤。
要部署模型 (Amazon适用于 Python 的开发工具包 (Boto 3))
-
获取包含支持部署多模型终端节点的映像的容器。有关支持多模型终端节点的内置算法和框架容器的列表,请参阅支持的算法和框架. 在此示例中,我们使用K 最近邻 (k-NN) 算法内置算法。我们将SageMaker Python SDK
实用程序 image_uris.retrieve()以获取 K 最近邻的内置算法映像的地址。import sagemaker region = sagemaker_session.boto_region_name image = sagemaker.image_uris.retrieve("knn",region=region) container = { 'Image': image, 'ModelDataUrl': 's3://<BUCKET_NAME>/<PATH_TO_ARTIFACTS>', 'Mode': 'MultiModel' } -
获取 Boto 3 SageMaker 客户端,并创建使用此容器的模型。
import boto3 sagemaker_client = boto3.client('sagemaker') response = sagemaker_client.create_model( ModelName ='<MODEL_NAME>', ExecutionRoleArn = role, Containers = [container]) -
(可选)如果您使用的是串行推理管道,请获取要包含在管道中的其他容器,并将其包含在
CreateModel的Containers参数中:preprocessor_container = { 'Image': '<ACCOUNT_ID>.dkr.ecr.<REGION_NAME>.amazonaws.com/<PREPROCESSOR_IMAGE>:<TAG>' } multi_model_container = { 'Image': '<ACCOUNT_ID>.dkr.ecr.<REGION_NAME>.amazonaws.com/<IMAGE>:<TAG>', 'ModelDataUrl': 's3://<BUCKET_NAME>/<PATH_TO_ARTIFACTS>', 'Mode': 'MultiModel' } response = sagemaker_client.create_model( ModelName ='<MODEL_NAME>', ExecutionRoleArn = role, Containers = [preprocessor_container, multi_model_container] ) -
(可选)如果您的使用案例不能从模型缓存中受益,请将
ModelCacheSetting字段中的MultiModelConfig将参数转为Disabled,然后将其包含在Container呼吁的论点create_model. 的价值ModelCacheSetting字段为Enabled默认情况下。container = { 'Image': image, 'ModelDataUrl': 's3://<BUCKET_NAME>/<PATH_TO_ARTIFACTS>', 'Mode': 'MultiModel' 'MultiModelConfig': { // Default value is 'Enabled' 'ModelCacheSetting': 'Disabled' } } response = sagemaker_client.create_model( ModelName ='<MODEL_NAME>', ExecutionRoleArn = role, Containers = [container] ) -
为模型配置多模型终端节点。我们建议您至少为终端节点配置两个实例。这样,SageMaker 可以跨多个可用区为模型提供一组高度可用的预测。
response = sagemaker_client.create_endpoint_config( EndpointConfigName ='<ENDPOINT_CONFIG_NAME>', ProductionVariants=[ { 'InstanceType': 'ml.m4.xlarge', 'InitialInstanceCount': 2, 'InitialVariantWeight': 1, 'ModelName':'<MODEL_NAME>', 'VariantName': 'AllTraffic' } ] )注意 在串行推理管道中只能使用一个启用多模型的终端节点。
-
使用
EndpointName和EndpointConfigName参数创建多模型终端节点。response = sagemaker_client.create_endpoint( EndpointName ='<ENDPOINT_NAME>', EndpointConfigName ='<ENDPOINT_CONFIG_NAME>')